
ventral en PVC soudé + embout en tuyau d'arrosage
4 participants
Page 1 sur 1

ventral en PVC soudé + embout en tuyau d'arrosage
par ebourzeix Lun 3 Déc - 3:44
Pour qui sait souder et coller du PVC, fabriquer un poumon n'a rien de sorcier.
En voici un exemple intéressant autour d'un filtre radial de grande capacité (type Cressi Super ARO).

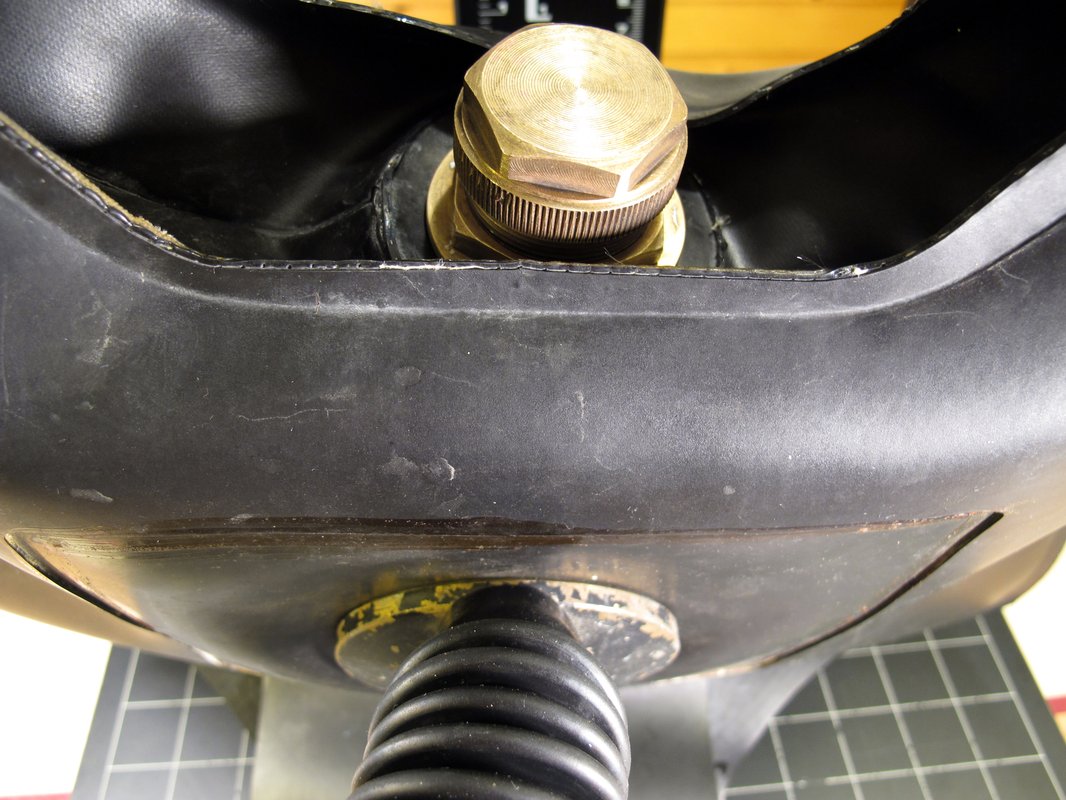
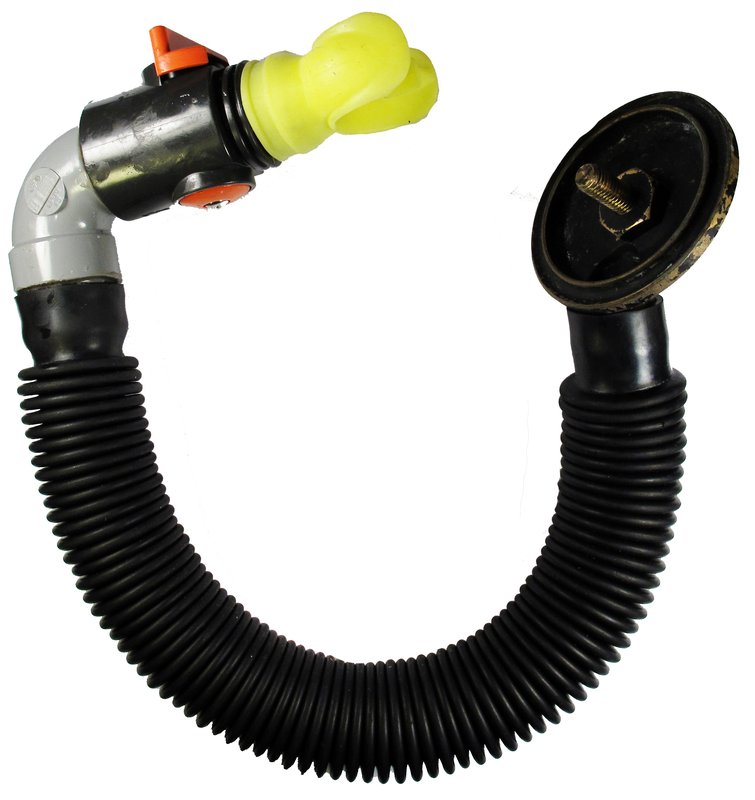
Le DSV (dive/surface valve) est composé d'un robinet GARDENA et d'un coude en PVC


En voici un exemple intéressant autour d'un filtre radial de grande capacité (type Cressi Super ARO).
Le DSV (dive/surface valve) est composé d'un robinet GARDENA et d'un coude en PVC
_________________
DOUXDING'S POWER ! MF1 FFESSM, instructeur PADI OWD, instructeur NAUI, utente pazzo aro
ebourzeix- Alopias Vulpinus (Membre honoraire)
")
- Nombre de messages : 2886
Age : 53
Localisation : Confoederatio helvetica
Date d'inscription : 19/07/2011
Re: ventral en PVC soudé + embout en tuyau d'arrosage
par Jean-Michel Lun 3 Déc - 7:53
superbe boulot : le coup des pièces Gardena est excellent !
_________________
Memento audere semper : souviens-toi d'oser toujours

Douxding's power dive team - TDI-SDI Assistant Instructeur - Niveau IV - Trimix - plongeur Pathfinder CCR Trimix - Instructeur photo/vidéo - plongeur recycleur O2 !

Jean-Michel- Carcharodon megalodon (Administrateur)
")
- Nombre de messages : 33056
Age : 58
Localisation : Région Parisienne
Date d'inscription : 17/06/2007 -

Re: ventral en PVC soudé + embout en tuyau d'arrosage
par Nostromo Lun 3 Déc - 10:38
À quand la production en masse?
_________________
La plongée à l'oxy pur est un travail qui se fait dans le feutré.
Nostromo- Alopias Vulpinus (Membre honoraire)
- Nombre de messages : 6320
Age : 44
Localisation : Paname
Date d'inscription : 04/09/2010
Re: ventral en PVC soudé + embout en tuyau d'arrosage
par ebourzeix Mer 5 Déc - 0:44

_________________
DOUXDING'S POWER ! MF1 FFESSM, instructeur PADI OWD, instructeur NAUI, utente pazzo aro
ebourzeix- Alopias Vulpinus (Membre honoraire)
- Nombre de messages : 2886
Age : 53
Localisation : Confoederatio helvetica
Date d'inscription : 19/07/2011
Re: ventral en PVC soudé + embout en tuyau d'arrosage
par Invité Dim 9 Déc - 12:45
J'ai vu il a peut être une dizaine d'année, un gars faire ses paliers à l'O2 avec un home made, tout en plastique, et lui aussi sponsorisé par Gardena. On avait vu ça aussi dans un vieux n° d'Octopus 1ère version, et aux environs de 2000 au Salon de la Plongée, sur le stand des AHR.
Invité- Invité
Re: ventral en PVC soudé + embout en tuyau d'arrosage
par PépéO2 Dim 9 Déc - 17:35
Ha ha, je suis admiratif de tous ces bricolages fantastiques, mais dont le look, a priori, inspire autant confiance qu'un avion de ligne Katangais 
J'avoue qu'en regardant la 1ère photo j'ai cru une demi seconde que tu avais installé un double éclairage sous marin dessus, du genre pas étanche..
J'avoue qu'en regardant la 1ère photo j'ai cru une demi seconde que tu avais installé un double éclairage sous marin dessus, du genre pas étanche..

PépéO2- Cetorhinus maximus

- Nombre de messages : 1352
Age : 52
Date d'inscription : 04/01/2012
Re: ventral en PVC soudé + embout en tuyau d'arrosage
par Jean-Michel Dim 9 Déc - 18:16
PépéO2 a écrit:Ha ha, je suis admiratif de tous ces bricolages fantastiques, mais dont le look, a priori, inspire autant confiance qu'un avion de ligne Katangais
J'avoue qu'en regardant la 1ère photo j'ai cru une demi seconde que tu avais installé un double éclairage sous marin dessus, du genre pas étanche..
je me permet de ne pas être de cet avis .... et je m'explique : un avion est un système tres complexe qui mal entretenu deviens infiniment faillible : en raison de la multiplicité des possibilités de pannes , un recycleur ventral est incroyablement simple comme je l'expliquais dans mon dessin ICI, en fiabilité simplicité rime avec peu de panne possibles : j'aurai donc tout a fait confiance dans un bricolage a partir du moment ou il est TRES facile de tester l'ensemble des éléments (contrairement a un avion ou l'on ne peut faire un test intégral a chaque vol)
sur ce ventral : qu'est ce qui peut déconner ? l'étanchéité du sac : elle est contrôlée avant chaque plongée ainsi que l'étanchéité du tuyau , le bon remplissage de la chaux (ça c'est opérateur dépendant .... si on oublie de remplir la chaux ou de la changer : bobo ... mais c'est valable sur toutes les machines) , le bon fonctionnement du détendeur qui lui aussi sera testé avant chaque plongée ....
bref rien inquiétant sur une telle machine, et son danger n'est pas dans sa conception simpliste : le danger du CCR02 est ailleurs : il faut apprendre a maitriser ces petites machines cela demande de l'expérience : ici un point commun avec l'aviation : le pilote est un élément indissociable des éventuels crashs
_________________
Memento audere semper : souviens-toi d'oser toujours
Douxding's power dive team - TDI-SDI Assistant Instructeur - Niveau IV - Trimix - plongeur Pathfinder CCR Trimix - Instructeur photo/vidéo - plongeur recycleur O2 !
Jean-Michel- Carcharodon megalodon (Administrateur)
- Nombre de messages : 33056
Age : 58
Localisation : Région Parisienne
Date d'inscription : 17/06/2007 -
Re: ventral en PVC soudé + embout en tuyau d'arrosage
par PépéO2 Dim 9 Déc - 18:30
Je plaisantais Jean-Michel, l'ami ebourzeix ayant moult fois démontré l'étendu de son savoir faire dans les nombreuses rubriques de MDP où vous nous régalez tous de vos trouvailles et de vos expériences, et ce en toute securité !
Mais je me mets à la place du prépa N1 ou OW de base qui flippe avant de faire son 1er vidage de masque, et je pense qu'il aurait une certaine inquiétude à utiliser un tel dispositif
Mais en ce qui me concerne je partage tout à fait ton analyse, et a ce titre je confierais sans problème mon sort à ce ventral, largement plus qu'à un avion Katangais
PépéO2- Cetorhinus maximus
- Nombre de messages : 1352
Age : 52
Date d'inscription : 04/01/2012
Re: ventral en PVC soudé + embout en tuyau d'arrosage
par Jean-Michel Dim 9 Déc - 19:35
PépéO2 a écrit:Je plaisantais Jean-Michel, l'ami ebourzeix ayant moult fois démontré l'étendu de son savoir faire dans les nombreuses rubriques de MDP où vous nous régalez tous de vos trouvailles et de vos expériences, et ce en toute securité !
Mais je me mets à la place du prépa N1 ou OW de base qui flippe avant de faire son 1er vidage de masque, et je pense qu'il aurait une certaine inquiétude à utiliser un tel dispositif
Mais en ce qui me concerne je partage tout à fait ton analyse, et a ce titre je confierais sans problème mon sort à ce ventral, largement plus qu'à un avion Katangais
la je suis bien d'accord et je ne cesse de répéter ici que malgré la simplicité apparente des CCR02 je pense que ce ne sont pas des machines a mettre entre toutes les mains, et c'est bien AMHA le vrai problème de ces engins : personne n'oserai plonger avec un CCR sportif moderne sans formation vue la complexité immédiatement perçue (affichages, tuyaux, complexité de l'appareil) , alors que ces petites machines semblent si simples .... une fois dans l'eau ce n'est pas du tout la même chanson, mais ça les CR de la MDP dive team vous l'ont montré
_________________
Memento audere semper : souviens-toi d'oser toujours
Douxding's power dive team - TDI-SDI Assistant Instructeur - Niveau IV - Trimix - plongeur Pathfinder CCR Trimix - Instructeur photo/vidéo - plongeur recycleur O2 !
Jean-Michel- Carcharodon megalodon (Administrateur)
- Nombre de messages : 33056
Age : 58
Localisation : Région Parisienne
Date d'inscription : 17/06/2007 -
Re: ventral en PVC soudé + embout en tuyau d'arrosage
par ebourzeix Mar 11 Déc - 0:03
Je conçois qu'un ventral bricolé fait parfois "machine en tuyaux de chiotte"
Pour être honnête, je tiens à préciser que les éléments présentés ici sont le fruit du travail essentiellement de 2 personnes. L'embout est l'oeuvre d'un (très grand) passionné de DC55, hélas décédé en rEvo d'un accident cardiaque. Il avait conçu cet embout parce qu'il avait perdu l'original (!). Le poumon est l'oeuvre d'un restaurateur professionnel d'automobiles anciennes qui maîtrise le découpage & collage du PVC.
Le recycleur le plus extravaguant est la bouillotte (poumon) pendulaire de l'américain Tom ROSE. "A HOT WATER BOTTLE PENDULUM", comme il l'appelait.

http://cedu2.tripod.com/award.htm
D'autres projets sont plus aboutis mais le principe reste le même. Voici la très belle réalisation d'un Américain parue en 2007 sur le forum RBW, le "MINA MK I MOD I DUAL PURPOSE REBREATHER".
C'est l'un des ventraux faits maison qui trouve le plus de grâce à mes yeux. Qui a dit "casserole" ?


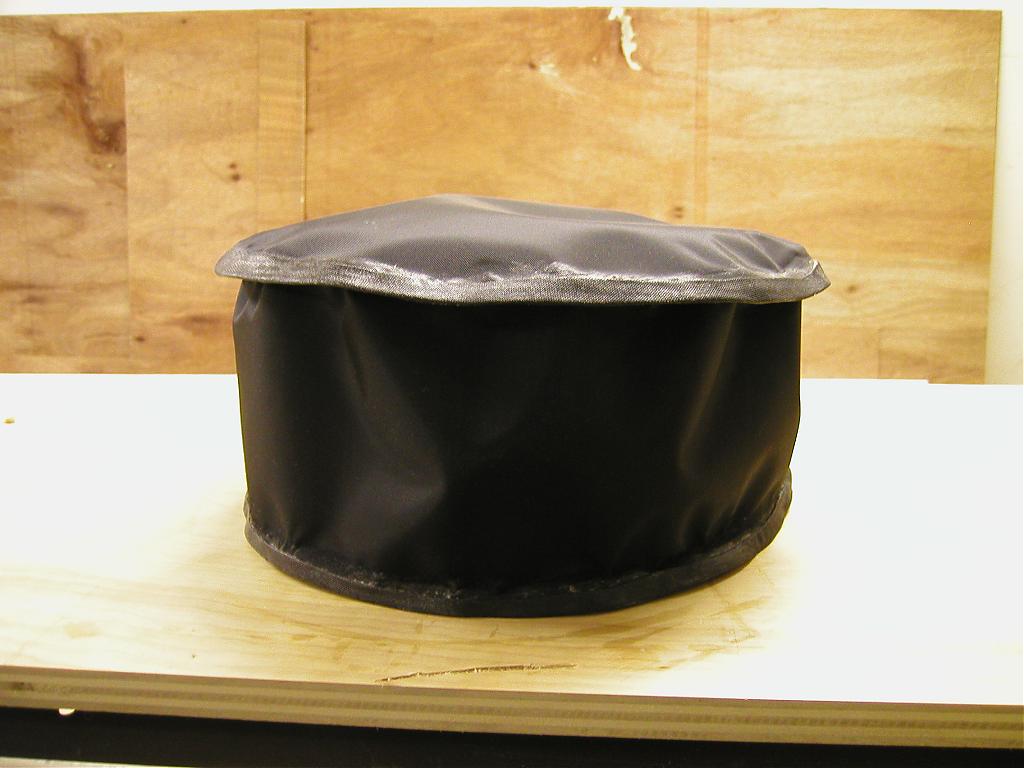


Un projet magnifique où une grande part des éléments vitaux ont été imaginés par son auteur: filtre et poumon pour ne citer que les principaux. L'embout est un classique Drager "RAY".
Outre les images de la machine, l'auteur en explique la génèse. Après un essai particulièrement physique, il en tire la conclusion que le filtre est inadapté.
Moi, je suis paresseux. Je prends des filtres italiens militaires qui ont fait leur preuve.
Néanmoins, ma machine a un gros défaut que j'ai constaté après essai...en regardant la TV sur mon canapé :coffe:
Je vous laisse deviner
Pour être honnête, je tiens à préciser que les éléments présentés ici sont le fruit du travail essentiellement de 2 personnes. L'embout est l'oeuvre d'un (très grand) passionné de DC55, hélas décédé en rEvo d'un accident cardiaque. Il avait conçu cet embout parce qu'il avait perdu l'original (!). Le poumon est l'oeuvre d'un restaurateur professionnel d'automobiles anciennes qui maîtrise le découpage & collage du PVC.
Le recycleur le plus extravaguant est la bouillotte (poumon) pendulaire de l'américain Tom ROSE. "A HOT WATER BOTTLE PENDULUM", comme il l'appelait.
http://cedu2.tripod.com/award.htm
D'autres projets sont plus aboutis mais le principe reste le même. Voici la très belle réalisation d'un Américain parue en 2007 sur le forum RBW, le "MINA MK I MOD I DUAL PURPOSE REBREATHER".
C'est l'un des ventraux faits maison qui trouve le plus de grâce à mes yeux. Qui a dit "casserole" ?
Un projet magnifique où une grande part des éléments vitaux ont été imaginés par son auteur: filtre et poumon pour ne citer que les principaux. L'embout est un classique Drager "RAY".
Outre les images de la machine, l'auteur en explique la génèse. Après un essai particulièrement physique, il en tire la conclusion que le filtre est inadapté.
RBW 2007 - MINA MK I MOD I DUAL PURPOSE REBREATHER
What follows here is a lengthly description of a new type of rebreather that is being dove and tested here in California. I tend to be a bit long-winded so now is the time for you to go get that cold beer or that glass of wine and when you are back I will do my best to make it worth your while to read this post...........You're back? OK here we go.
This rebreather is unique in several ways but it is principally different from other units in that the scrubber was designed to be inserted INSIDE the counter lung and is accessed via a drysuit zipper. The reasons why it was done this way will be described below.
WHY WAS THE THING BUILT?
This rebreather was designed for divers wishing to dive to a maximum depth of 130 FSW for up to one and a half hours at a time and who want the minimal of equipment but still want to be safe doing it. It was also designed for divers who would like a pure oxygen rig for diving in the shallows. It has been dove in this mode several times to date. It will soon be a mixed gas manually controlled unit for going deeper than 21 fsw; I am waiting for the money to buy the electronics and the CMF valve. It has not been dove past 21 feet as of yet. Lastly, it may be an excellent bailout rebreather because it is so small and lightweight and can be used with almost any BC/harness that is available on the market today, or yesterday.
The MINA can fill the above roles quickly and easily because it was designed to be versatile and modular requiring no tools to change from one type to the other-just push buttons and add or remove the equipment. It is very robust with the lung being fully inclosed in a forged aluminum case. It is simple, breathes well, and every part that went into its construction was chosen because it was readily available and inexpensive. The MINA is practical too, because the scrubber medium can be changed out in record time, securely, without tools. The project took one and a half years from inception to its current form and cost me approximately $1,200 to complete, not including the BC.
My buddies and I like to dive but we are also very intrigued by the technical side that rebreather diving offers and weve spent hours debating what rebreathers, both past and present, are the best and why we feel so. What is the best rebreather? In my mind, its the one that serves your needs the closest and allows you to dive where you want to dive, safely.
I enjoy diving pure oxygen rebreathers down to 1.6 ATM because there is so much to see in the shallow depths along the coasts. Sea life flourishes in the sunlight that penetrates to 20 feet and there is a never ending shoreline to explore in every ocean and lake. Also, I never find myself too far from dry land and this adds to the safety of this type of diving. However, being a diver of some 24 years I also know that I have a desire to go deeper on a regular basis, too. A rebreather that can perform double duty here is what I would like. Small size and low weight are important because we tend to walk long distances along the shore to enter the water. Give me a light and compact rebreather any day over a heavy and bulky one. A robust rebreather is important for me because I dive in shore break conditions and also because Ive found that the garage monster has an appetite for my diving gear as does the trunk monster. Price is always a concern for me even though I hold down two jobs here in the good old (expensive) O.C.
I have owned and dove several military units in my time and I like them, especially the front-mounts. But heaven help you if you break something and need the part replaced with an original. Parts availability is important to me. Being able to change the scrubber medium easily and quickly was important to me. So basically, when I announced to my friends that I was going to try and build something better they called me out and said talk is cheap. They wanted to see the finished product. The MINA is my all-out effort to produce a rebreather that hits on all the points mentioned above.
The MINA is a front-mount type because that is the kind I have come to enjoy best. Even though front-mounts clutter the front of you they still have their advantages: The hoses can be shorter reducing unwanted buoyancy. For some divers the breathing characteristics are more suitable to their tastes in the sense that the inhale is easier than the exhale. It is generally easier to access the components of the rebreather under water and you can sometimes see what is going on if something isn't right. For example, with the Mina, I can easily press the automatic diluent-add button, turn the diluent on or off, turn the oxygen on or off, add O2, and I know if the lung or any of the components attached to it are allowing gas to escape into the water because I can see the bubbles going by my mask. These features are present in some of the rebreathers out there but in my opinion they are easier to manipulate/see with the front-mount type.
The disadvantages are that some divers ears may bother them because of the pressure differential between the eustachian tubes and the lung. It can be more difficult to get into a boat from the water without a ladder unless you remove the rebreather. Clamoring up onto rocks to get out of surf can be harder and, as was mentioned, you've got equipment on the front of you when you may wish to be uncluttered there. Lastly, if the rebreather is too heavy it can really reek havoc on your neck if you have to walk long distances along the shore to your entry/exit spot. I addressed this problem by mounting the bottles/valves/first stages on my back.
For those of you still unconvinced the Mina MK II back mount rebreather is being developed as we speak. The MK II will be larger with a 16" diameter case whereas the MK I front mount, discussed here, utilizes a 12" diameter case. The MK II will have a larger scrubber and therefore longer duration. Otherwise, the two types will be virtually the same.
WHY IS THE SCRUBBER INSIDE THE LUNG?
I went home and started spending hours drawing countless loop designs in an effort to try and make a loop that was more compact than what was already available without sacrificing good, low WOB characteristics. I tried keeping in mind that every piece I drew had to be readily available at Lowes, Home Depot, the local hardware store or from the diving equipment manufacturers. I put the scrubber on the back, front, sides, top and bottom. I put the lung on the back, top, sides and bottom. I tried to eliminate the hoses. I tried to shorten the hoses. I drew square lungs, round scrubbers. I drew round scrubbers and square lungs. I tried to eliminate the 2nd stages. I tried to combine the second stages. I tried to make sure that whatever I drew would somehow be compatible with buoyancy compensators that are readily available. On and on it went for three months until one day it dawned on me, like a bolt of lightning: put the scrubber inside the lung and the loop will be more compact. Put the scrubber inside the lung and it will operate as efficiently as possible, due to its being insulated completely from the water. Put the scrubber INSIDE the lung and the scrubber will not need to be built watertight. In fact, the scrubber could be one of the simplest types ever made, open on one end, which would make it lighter and cheaper and easier to build. Put the scrubber inside the lung and accomplish several of the design criteria in one fell swoop.
THE PARTICULARS
My Wife says get down to it already. A dry suit zipper is used to access the scrubber. Although expensive, the zipper has proven to be most practical because it is easy to operate and does not leak. Drager hoses and DSV were used as well as a Drager dosage unit. Both of these are from the Ray. The hoses were cut to make them shorter and the elbows were also used. In pure O2 mode, the dosage unit supplies 100% oxygen through a 50 % orifice that has had the little hole filled. This has turned the dosage unit into nothing more than a demand second stage. In mixed gas mode the dosage unit will supply the diluent in the same manner. Currently three p-ports are being used (inhale/exhale hoses, dosage unit). The over pressure valve is from a dry suit. The bubble diffuser was crafted from a 3" PVC pipe cap and contains some of my blood, sweat and tears. Foam is used to diffuse the bubbles. When diving from the shore we sometimes do out-and-back trips where we find ourselves on the ascent leg for half the trip. Brass hardware was used everywhere when bolts and nuts were needed. The counter lung was manufactured for me by Jay Harding (jmhardingjr). It is made of good quality material and is therfore tough. The seams are bulletproof. He glued it and seamed it with heat. It has a 5" gusset which houses the p-ports, zipper, and OPV. He did a great job and I recommend his services to anyone needing a custom lung. He cares as much about the success of this project as I do. We've become friends. The case was once a cooking pot made by IMUSA. The clamps that hold the two peices of the case together securely took forever and a day to locate and are from Southco. They are good people who donated them to my project so that it could be completed and they even expedited them. The grey neck and waist straps came from a Russian IDA 71. All machining was done at home using a dremel tool, sandpaper, files, drill, rivet gun and the MK I MOD I arm.
THE SCRUBBER
The scrubber is made of four inch diameter PVC pipe and the screens are the drainage ones made for that type of pipe. Inside the lung is a four inch to three inch coupler and attached to the coupler is a rubber cap that the exhale hose p-port is mounted to. The scrubber bed is compacted with a brass rod and wing-nut to prevent channeling. Porex screens are being experimented with to keep dust out of the lung. The scrubber is unique in that the main unit, which I call the module, is the only part that is removed from the lung when changing the lime. The procedure is very easy and quick. You can reeinsert the module the opposite way around if you so desire as both ends are the same and fit into the coupler. Or, you may choose to extend the module part-way out of the lung and change it that way if you would like. The scrubber is secure inside while diving and does not wobble around. Not including the work, the scrubber for the MINA can be built for $20.00 so making more than one for quick change-outs is possible.
ALMOST THE END
I hope that you have enjoyed reading this post and I hope it was worth your time. I would like to thank everyone who has posted interesting information on this wonderful site. I thank you because I probably used it to get my project this far. Posting all this is my way of saying thanks. I have particularly enjoyed posts by Dave Sutton, customworks, JAAP, Paul with the REVO, and there are just too many more to list. I would like to thank my good friends, in no particular order: Thom Susko (seabass) and Dave Zebell (dz3866). Without their help this project would not have been possible.
I welcome your comments, both good and bad. I will try to get back to you. If you all would like I will keep you informed of the progress that is being made as major stuff gets finished. If you would like to build a MINA I would be happy to help you. If you would like me to build parts of one for you or the whole thing I can but I have to be compensated for my time as I work other jobs. If you would like to see the MINA and perhaps dive it I am planning on going to the DEMA show this year and will be bringing it along. Let me know if you will be attending and we can meet up. Dont stop working on those projects! I am going to be sad when mine are done! The End of the beginning...
P.S. to see more photos go to Mina MK I photos in the homebuilders forum
RBW 30.11.2010
Over the years several rebreatherworld members have asked various questions about this rebreather. For the fun of it I am posting some photos of it as it appears today.
This rig and I have been through some rough times. In 2008 I decided to take it out for an entire week in the worst conditions you can imagine for the sole purpose of testing it. Huge Laguna Beach swells came in for about five days and youve got to visit Laguna Beach, CA when a swell hits to appreciate what I mean by raw power. Well, the beaches were closed all week for swimming and diving but I figured it was the best time to find out if this thing was as tough as I was saying it was so I snuck past the lifeguards for five consequtive days and went for it alone. I am going to humbly admit that I will never do that again. I felt I was never going to get to shore again more than once. The bubbles from the crashing waves overhead were at times extending down past 20 feet. I would be sitting there being scraped along the rocky bottom in the surge and then all of sudden-total white out. On one dive the surging water roared around me and swooped me off the bottom and I went straight up, 20 feet and popped through the surface like a cork. I had no control over this ascent. Looking at the next wall of water about to drop on my head made me beat a hasty retreat back to the bottom and I sat there pondering: how in the world am I going to clamor out on the rocks with this roaring going on.
On the fifth day, the final day, I had had enough. I struggled hard for twenty-five minutes to exit the sea. After timing the waves and the surge I finally dragged my body onto dry rocks and lay there just completely drained like a dead person. I had no idea some people on the top of the cliff above me had noticed so they sent help. After several minutes I got to my knees and was a bit embarrased when these folks came running along the reef to try and save me.
I hope no one reading this thinks that I am writing it to try and make myself look macho or tough or something. I was scared to death. But, the MK I, which had been totally abused, being scraped, dragged and banged every day held together without a failure. However, two times during that week I overbreathed the scrubber and felt that panic feeling that a CO2 hit produces. I hate that feeling. When it happened the second time I felt like no air was coming to me even though I was breathing and had oxygen in the bottle. I had no choice but to surface and head far out past the breakers and just sit there riding the swells up and down till I was calm enough to go back down and attempt to get through the surf again. I was glad I had a BC then.
In an attempt to build a rig as small as possible I built a scrubber that is not large enough to handle this sort of stressful diving. However, in the years since I have not had a breakthrough and this is because I dive in calm conditions and therefore my breathing rate is more controlled. A scrubber of this size works ok under these conditions. I am putting this all down to assist any homebuilders out there who may be building scrubbers with approximately twenty square inches of lime in their design.
On a final note, the MK I is being retired. The MK II is a modernized version of the MK I and I expect it to work well for the next few years. If you would like more information about the MK II, or the back-mount versions of it that have been built please type 'ngr' in your search field. All of the parts that we used to build our rebreathers are available if you choose to build one yourself.
Well, thats about it. My buddies and I are continuing to experiment with new ideas and we are going diving this week together. Ive had the greatest time working with them on our projects. As I look at the old scratched up MK I, I remember those terrible days in the waves. Now I am looking at the MK II with the soft-shell cordura covering. Is it as tough as the MK I? I might just have to go to Laguna and find out...
Moi, je suis paresseux. Je prends des filtres italiens militaires qui ont fait leur preuve.
Néanmoins, ma machine a un gros défaut que j'ai constaté après essai...en regardant la TV sur mon canapé :coffe:
Je vous laisse deviner
_________________
DOUXDING'S POWER ! MF1 FFESSM, instructeur PADI OWD, instructeur NAUI, utente pazzo aro
ebourzeix- Alopias Vulpinus (Membre honoraire)
- Nombre de messages : 2886
Age : 53
Localisation : Confoederatio helvetica
Date d'inscription : 19/07/2011
Re: ventral en PVC soudé + embout en tuyau d'arrosage
par Jean-Michel Mar 11 Déc - 0:11
jolie compil de docs : la bouillotte de Tom Rose me fait toujours autant marrer
par contre pour ton énigme ... je ne vois pas
par contre pour ton énigme
... je ne vois pas_________________
Memento audere semper : souviens-toi d'oser toujours
Douxding's power dive team - TDI-SDI Assistant Instructeur - Niveau IV - Trimix - plongeur Pathfinder CCR Trimix - Instructeur photo/vidéo - plongeur recycleur O2 !
Jean-Michel- Carcharodon megalodon (Administrateur)
- Nombre de messages : 33056
Age : 58
Localisation : Région Parisienne
Date d'inscription : 17/06/2007 -
Re: ventral en PVC soudé + embout en tuyau d'arrosage
par ebourzeix Mar 11 Déc - 0:59
Le tuyau. Il a un trop grand diamètre.
Dangereux.
Dangereux.
_________________
DOUXDING'S POWER ! MF1 FFESSM, instructeur PADI OWD, instructeur NAUI, utente pazzo aro
ebourzeix- Alopias Vulpinus (Membre honoraire)
- Nombre de messages : 2886
Age : 53
Localisation : Confoederatio helvetica
Date d'inscription : 19/07/2011
Re: ventral en PVC soudé + embout en tuyau d'arrosage
par Jean-Michel Mar 11 Déc - 7:51
ebourzeix a écrit:Le tuyau. Il a un trop grand diamètre.
Dangereux.
et pourquoi sur ton canapé ? la migraine du au C02 t'a rappelé a l'ordre ?
_________________
Memento audere semper : souviens-toi d'oser toujours
Douxding's power dive team - TDI-SDI Assistant Instructeur - Niveau IV - Trimix - plongeur Pathfinder CCR Trimix - Instructeur photo/vidéo - plongeur recycleur O2 !
Jean-Michel- Carcharodon megalodon (Administrateur)
- Nombre de messages : 33056
Age : 58
Localisation : Région Parisienne
Date d'inscription : 17/06/2007 -
Re: ventral en PVC soudé + embout en tuyau d'arrosage
par ebourzeix Mar 11 Déc - 7:59
pas jusque-là tout de même...mais j'ai senti au final que l'air circulait assez peu.
_________________
DOUXDING'S POWER ! MF1 FFESSM, instructeur PADI OWD, instructeur NAUI, utente pazzo aro
ebourzeix- Alopias Vulpinus (Membre honoraire)
- Nombre de messages : 2886
Age : 53
Localisation : Confoederatio helvetica
Date d'inscription : 19/07/2011
» mCCR pendulaire, le ventral "low cost"
» ventral submatix
» formation ISE sur le recycleur ventral
» les débuts du recycleur ventral...
» question recycleur ventral
» ventral submatix
» formation ISE sur le recycleur ventral
» les débuts du recycleur ventral...
» question recycleur ventral
Page 1 sur 1
Permission de ce forum:
Vous ne pouvez pas répondre aux sujets dans ce forum|
|
|